User guide
Install your GPS tracker
in 3 simple steps
No wiring, no tools, no technical skill. Your TRAKmy tracker is up and running in under 5 minutes — wherever you want to put it.
Steps at a glance
Step 1
Activate your tracker
with the magnet
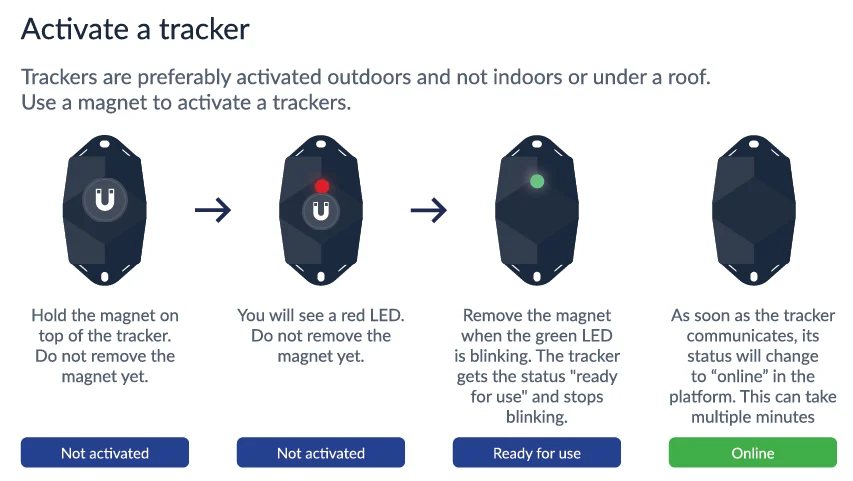
Trackers can be delivered in sleep mode to preserve the battery. Activation is done with the small magnet included in the box — in a few seconds, before mounting anything on the asset.
Hold the magnet for 3–5 sec against the front face of the tracker (TRAKmy logo visible)
Take the magnet out of the box
The TRAKmy kit includes an activation magnet. Check that it is there before you start.
Hold it against the front face for 3–5 sec
The front face is the one with the TRAKmy logo. Hold until the green LED flashes.
Green LED → status Online ✓
The status changes to Online on the TRAKmy platform within 5 minutes.
Always activate before mounting ⚠ Required
Once mounted on the asset, reaching the front face of the tracker can be difficult or impossible. Check that the status is Online on the platform before mounting anything.
Hold the magnet against the tracker for 3–5 seconds
Hold the magnet directly against the front face of the tracker (the one with the TRAKmy logo) for 3 to 5 seconds. A green LED should flash — that is the sign activation has started.
A flashing green LED means activation is under way. Wait until the flashing stops before moving to the next step. The LED switches off by itself once the sequence is complete.
Important: Always activate the tracker before mounting it on the asset. Once mounted, it can be hard to reach again.
Check the status on the platform
Within 5 minutes of activation, the tracker status changes from “Ready to use” à “Online” in the TRAKmy app or the web platform. That confirms the tracker is talking to our servers.
Ready to use
Before activation — sleep mode
Online ✓
Activation successful — tracker active
Step 2
Choose your
mounting method
The method depends on the type of asset, exposure to vibration and how permanent you want it to be. Every TRAKmy tracker works with several methods.
Recommended · Outdoor
Rivets
The strongest method for outdoor assets (construction, logistics, containers). Easy to fit, very resistant. Use stainless steel rivets on outdoor metal, aluminium on plastic or fabric.
Removable · Magnetic surfaces
Magnet kit (MNT MAG)
Ideal for assets in a controlled environment when you need to detach the tracker quickly. TRAKmy magnet kits are available (ULTRA and COMPACT references). Do not use in an uncontrolled environment — risk of removal.
Easy · Indoor
Double-sided tape
Simple and does no damage to the asset. Recommended only for assets with little vibration or shock. Surface and tracker must be clean and dry. Recommended products: 3M Acrylic Plus PT1000 or 3M VHB GPH-110GF.
Permanent · High strength
Bolts and screws
Stronger than rivets because removable, but needs access from both sides. Use a threadlocker (Loctite Blue 242) to prevent loosening from vibration. Do not exceed the maximum torque stated.
Quick · Temporary
Cable ties
Metal ties (5–6 mm wide) for a quick fix. Plastic ties are fine if the tracker has to be removed often. Note: they can easily be cut.
Permanent · Any surface
Adhesive (MS polymer)
Very strong once cured, but hard to remove (voids the warranty if torn off). Avoid on assets subject to vibration. Curing: at least 6 hours before use. MS polymer adhesive is recommended for most trackers.
Method compatibility by product
| TRAKmy product | Rivets | Screws/bolts | Adhesive | Double-sided tape | Cable ties | Magnets |
|---|---|---|---|---|---|---|
| ULTRA N+ (TRACK 1101) | ✓ | ✓ | ✓ | ✓ | ✓ | ✓ |
| ULTRA N (TRACK 1141) | ✓ | ✓ | ✓ | ✓ | ✓ | ✓ |
| COMPACT (TRACK 1115) | ✓ | ✓ | ✓ | ✓ | ✓ | — |
| REACT (TRACK 1215) | — | — | ✓ | ✓ | ✓ | — |
Never surround the tracker completely with metal — it blocks the GPS and NB-IoT signal and causes data loss. The tracker must always be able to “see” the sky, at least partly, for the best positioning.
Step 3
Where to install the tracker
depending on your vehicle
Placement is crucial for GPS and NB-IoT signal quality. Here is the installation advice by type of vehicle or asset.
Golden rule: Position the tracker so it can pick up its GPS signal and send it over NB-IoT as well as possible. Absolutely avoid spaces completely surrounded by metal and confined spaces. Prefer the cabin, the bumpers and plastic areas.
Modern car
Classic car
Classic cars contain far more metal than modern models. Be especially careful about placement.
Motorcycle / Scooter
Motorhome / Van
Boat / Jet ski
Construction machinery / site assets
Crates / stillages / logistics assets
Trailers / semi-trailers
Troubleshooting
Troubleshooting
Most activation or signal problems are solved in a few minutes. Here are the answers to the most common cases.
The tracker does not show as “Online” within 5 minutes of activation
Activating the network subscription with the operator can take longer depending on the local back-end systems involved.
Wait 5 minutes after the LED flashes. The status should change to Online.
If it is still not Online : hold the magnet again for 5 seconds to trigger another attempt. Repeat until the status is Online.
Still not Online after 12 hours : contact TRAKmy support — it may point to another problem.
The LED does not flash when I hold the magnet against it
Check that you are holding the magnet against the front face of the tracker (with the TRAKmy logo) and not on the sides or the back. The magnet must be held for at least 3 to 5 seconds.
If it still does not work, the tracker may already have been activated before delivery — check its status directly in the app.
The tracker is online but gives no GPS position
Several possible causes:
- →The tracker is inside a building or a vehicle — the first GPS fix can take a few minutes outdoors.
- →The tracker is surrounded by metal — move it to a less shielded area.
- →The tracker is new — leave it outside for a few minutes for its first GPS sync.
The tracker came off, or the fixing failed
If the tracker was fixed with tape and came off after vibration or shocks, the mounting method is probably not suited to that asset.
Solution: For assets subject to vibration (construction machinery, trailers, vans), use stainless steel rivets or bolts with threadlocker (Loctite Blue 242) rather than tape alone.
Clean the surface before any new fixing (degreaser or isopropyl alcohol) and let it dry completely.
How do I check the installation is correct before putting the asset back into service?
In the TRAKmy app, check the two indicators:
- ✓Data network (NB-IoT): a green icon means the tracker is talking to our servers.
- ✓Satellite network (GPS): a green icon means the tracker is picking up GPS satellites.
Only put the asset back into service when both indicators are green. For B2B fleets on the TRAKmy platform, also check that the asset appears with the status Online.
Can I use an enclosure to conceal the tracker?
Yes, you can use an enclosure the same colour as the place where the tracker is installed. Make absolutely sure that the enclosure is not metal — otherwise it will block the GPS and NB-IoT signal.
A plastic or composite enclosure works perfectly and improves discretion without hurting performance.
Need help?
Our team is here
to support you
Human support based in Nîmes, available by phone and email. Monday to Friday, 9am–12pm / 2pm–6pm.